Articles Technology Blog News Company
BlogSort
Download now!
Free & open source,
0.6 MB

Source code

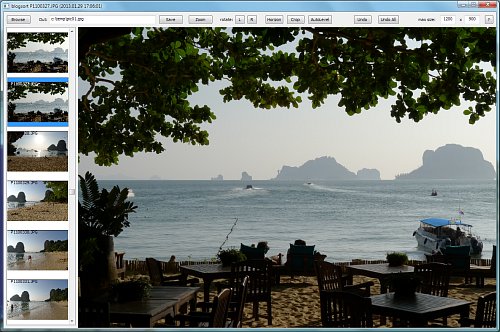
A simple Windows app for viewing photos and preparing them for a blog: rotate, crop, resize and save as jpeg, all in a snap! Reads and prepares pictures in background, so stepping to next or previous photo takes 0 seconds. Automatically selects output size for a picture, given max values. Automatically advances output file names, like cat01.jpg -> cat02.jpg -> cat03.jpg...

Usage

Select an image by pressing Browse button. Images from that folder will be displayed as thumbnails on the left. You can use keyboard up/down arrows to iterate over images or just use your mouse. When some image is selected and displayed in the main window the following operations are available:
  • Turn 90 degrees left or right by clicking buttons L or R in the window or pressing L or R on keyboard.

  • Line up horizon: select two points on the image by clicking them with right mouse button.

    Then press H on keyboard or click "Horizon" button in the window. The image will be rotated so the two selected points will become on one horizontal line.

  • Crop: select image part using left mouse button, then press C keyboard button or "Crop" window button.

    You can clear current horizon marks and cropping rectangle by pressing ESC.

  • Auto Levels: press keyboard button A or "AutoLevel" window button to normalize image brightness.

  • Zoom: by pressing Z keyboard button or "Zoom" window button you can switch between showing whole image (resized to fit) or showing just central part of it but with 1:1 scale (using target size).

  • Save: press G on keyboard (meaning "go" or "good") or "Save" window button to save current image to a file which name is set in "Out:" textbox. If your file name ends with digits, the program will automatically increase the number after saving, making a new file name. For example, after saving file named "photo03.jpg" the textbox will change to "photo04.jpg" which can be used for saving the next photo. This way you don't need to specify names for each file, just set a name once for a set of images. Your image will be automatically resized so that its width and height fit into the limits set in "max size:" boxes on the top right of the window. Aspect ratio will be preserved, you don't need to specify different resolutions for landscape and portrait photos, just set maximum width and height for both. Images are saved to JPG format.

    In the left window thumbnails of saved images are marked with green border.

  • You can undo your last operation (rotate, crop or autolevel) by pressing "Undo" window button. By pressing "Undo all" you cancel all transformations and get the original image.

Some details

Written in D language using DFL library for GUI.

License: MIT (see license.txt).

Source code is available on GitHib.

Download now